 单元测试
单元测试
# 单元测试概述
单元测试(unit testing)是指对软件中的最小可测试单元进行检查和验证。它是软件测试中的一种基本方法,也是软件开发过程中的一个重要步骤。
单元测试的目的是在于确保软件的每个独立模块都被正确地测试,并且没有潜在的缺陷或漏洞。在单元测试中,需要对每个模块进行测试,以确保它们能够按照预期的方式工作,并且没有任何错误或漏洞。
单元测试通常包括以下几个步骤:
- 确定测试范围:在开始测试之前,需要确定测试的范围,即要测试的功能或模块。
- 编写测试用例:根据确定的测试范围,编写测试用例,这些用例应该覆盖软件中的每个模块。
- 执行测试用例:使用测试工具(如JUnit、TestNG、Mock等)执行测试用例,以确保每个模块都按照预期的方式工作。
- 分析测试结果:在测试完成后,需要分析测试结果,以确定是否存在缺陷或漏洞。
- 修复缺陷或漏洞:如果发现缺陷或漏洞,需要修复它们,以确保软件的质量。
# 单元测试框架
# JUnit
# JUnit的重要概念:
| 名称 | 功能作用 |
|---|---|
| Assert | 断言方法集合 |
| TestCase | 表示一个测试案例 |
| TestSuite | 包含一组TestCase,构成一组测试 |
| TestResult | 收集测试结果 |
# JUnit的一些注意事项及规范:
(1) 测试方法必须使用@Test 修饰
(2) 测试方法必须使用public void 进行修饰,不能带参数
(3) 测试代码的包应该和被测试代码包结构保持一致
(4) 测试单元中的每个方法必须可以独立测试,方法间不能有任何依赖
(5) 测试类一般使用 Test作为类名的后缀
(6) 测试方法使一般用test 作为方法名的前缀
# JUnit失败结果说明:
(1) Failure:测试结果和预期结果不一致导致,表示测试不通过
(2) error:由异常代码引起,它可以产生于测试代码本身的错误,也可以是被测代码的Bug
# JUnit内容
# (1) 断言的API
| 断言方法 | 断言描述 |
|---|---|
| assertNull(String message, Object object) | 检查对象是否为空,不为空报错 |
| assertNotNull(String message, Object object) | 检查对象是否不为空,为空报错 |
| assertEquals(String message, Object expected, Object actual) | 检查对象值是否相等,不相等报错 |
| assertTrue(String message, boolean condition) | 检查条件是否为真,不为真报错 |
| assertFalse(String message, boolean condition) | 检查条件是否为假,为真报错 |
| assertSame(String message, Object expected, Object actual) | 检查对象引用是否相等,不相等报错 |
| assertNotSame(String message, Object unexpected, Object actual) | 检查对象引用是否不等,相等报错 |
| assertArrayEquals(String message, Object[] expecteds, Object[] actuals) | 检查数组值是否相等,遍历比较,不相等报错 |
| assertArrayEquals(String message, Object[] expecteds, Object[] actuals) | 检查数组值是否相等,遍历比较,不相等报错 |
| assertThat(String reason, T actual, Matcher<? super T> matcher) | 检查对象是否满足给定规则,不满足报错 |
# (2) JUnit常用注解:
1) @Test: 定义一个测试方法 @Test(excepted=xx.class): xx.class 表示异常类,表示测试的方法抛出此异常时,认为是正常的测试通过的 @Test(timeout = 毫秒数) :测试方法执行时间是否符合预期。
2) @BeforeClass: 在所有的方法执行前被执行,static 方法全局只会执行一次,而且第一个运行。
3) @AfterClass:在所有的方法执行之后进行执行,static 方法全局只会执行一次,最后一个运行。
4) @Before:在每一个测试方法被运行前执行一次。
5) @After:在每一个测试方法运行后被执行一次。
6) @Ignore:所修饰的测试方法会被测试运行器忽略。
7) @RunWith:可以更改测试执行器使用junit测试执行器。
# JUnit使用
# Controller层单元测试
(1) Springboot中使用maven引入Junit非常简单, 使用如下依赖即可引入:
<dependency>
    <groupId>org.springframework.boot</groupId>
    <artifactId>spring-boot-starter-test</artifactId>
    <scope>test</scope>
</dependency>
2
3
4
5
(2) 代码入下:
@RunWith(SpringRunner.class)
@SpringBootTest(classes = MainApplication.class)
public class StudentControllerTest {

	// 注入Spring容器
    @Autowired
    private WebApplicationContext applicationContext;
    // 模拟Http请求
    private MockMvc mockMvc;

    @Before
    public void setupMockMvc(){
    	// 初始化MockMvc对象
        mockMvc = MockMvcBuilders.webAppContextSetup(applicationContext).build();
    }

    /**
     * 新增学生测试用例
     * @throws Exception
     */
    @Test
    public void addStudent() throws Exception{
        String json="{"name":"张三","className":"三年级一班","age":"20","sex":"男"}";
        mockMvc.perform(MockMvcRequestBuilders.post("/student/save")    //构造一个post请求
                    // 发送端和接收端数据格式
                    .contentType(MediaType.APPLICATION_JSON_UTF8)
                    .accept(MediaType.APPLICATION_JSON_UTF8)
                    .content(json.getBytes())
            )
           // 断言校验返回的code编码
           .andExpect(MockMvcResultMatchers.status().isOk())
           // 添加处理器打印返回结果
           .andDo(MockMvcResultHandlers.print());
    }
}
2
3
4
5
6
7
8
9
10
11
12
13
14
15
16
17
18
19
20
21
22
23
24
25
26
27
28
29
30
31
32
33
34
35
只需要在类或者指定方法上右键执行即可,可以直接充当postman工作访问指定url,且不需要写请求代码,这些都由工具自动完成。
(3)案例中相关组件介绍
本案例中构造mockMVC对象时,也可以使用如下方式:
@Autowired
private StudentController studentController;
@Before
public void setupMockMvc(){
   // 初始化MockMvc对象
   mockMvc = MockMvcBuilders.standaloneSetup(studentController).build();
}
2
3
4
5
6
7
其中MockMVC是Spring测试框架提供的用于REST请求的工具,是对Http请求的模拟,无需启动整个模块就可以对Controller层进行调用,速度快且不依赖网络环境。
使用MockMVC的基本步骤如下:
- mockMvc.perform执行请求
- MockMvcRequestBuilders.post或get构造请求
- MockHttpServletRequestBuilder.param或content添加请求参数
- MockMvcRequestBuilders.contentType添加请求类型
- MockMvcRequestBuilders.accept添加响应类型
- ResultActions.andExpect添加结果断言
- ResultActions.andDo添加返回结果后置处理
- ResultActions.andReturn执行完成后返回相应结果
# Service层单元测试
可以编写如下代码对Service层查询方法进行单测:
@RunWith(SpringRunner.class)
@SpringBootTest
public class StudentServiceTest {

	@Autowired
    private StudentService studentService;

    @Test
    public void getOne() throws Exception {
    	 Student stu = studentService.selectByKey(5);
         Assert.assertThat(stu.getName(),CoreMatchers.is("张三"));
    }
}
2
3
4
5
6
7
8
9
10
11
12
13
# Dao层单元测试
可以编写如下代码对Dao层保存方法进行单测:
@RunWith(SpringRunner.class)
@SpringBootTest
public class StudentDaoTest {

	@Autowired
    private StudentMapper studentMapper;

    @Test
    @Rollback(value = true)
    @Transactional
    public void insertOne() throws Exception {
    	 Student student = new Student();
    	 student.setName("李四");
    	 student.setMajor("计算机学院");
    	 student.setAge(25);
    	 student.setSex('男');
    	 int count = studentMapper.insert(student);
    	 Assert.assertEquals(1, count);
    }
}
2
3
4
5
6
7
8
9
10
11
12
13
14
15
16
17
18
19
20
其中@Rollback(value = true) 可以执行单元测试之后回滚所新增的数据,保持数据库不产生脏数据。
# idea中查看单元测试覆盖率
(1) 单测覆盖率
测试覆盖率是衡量测试过程工作本身的有效性,提升测试效率和减少程序bug,提升产品可靠性与稳定性的指标。
统计单元测试覆盖率的意义:
1) 可以洞察整个代码中的基础组件功能的所有盲点,发现相关问题。
2) 提高代码质量,通常覆盖率低表示代码质量也不会太高,因为单测不通过本来就映射出考虑到各种情况不够充分。
3) 从覆盖率的达标上可以提高代码的设计能力。
(2) 在idea中查看单元测试覆盖率很简单,只需按照图中示例的图标运行,或者在单元测试方法或类上右键Run 'xxx' with Coverage即可。执行结果是一个表格,列出了类、方法、行数、分支覆盖情况。
(3) 在代码中会标识出覆盖情况,绿色的是已覆盖的,红色的是未覆盖的。
(4) 如果想要导出单元测试的覆盖率结果,可以使用如下图所示的方式,勾选 Open generated HTML in browser
# 单元测试工具-Mockito
# Mockito简介
在单元测试过程中主张不要依赖特定的接口与数据来源,此时就涉及到对相关数据的模拟,比如Http和JDBC的返回结果等,可以使用虚拟对象即Mock对象进行模拟,使得单元测试不在耦合。也即更方便的构建数据,可以让中间的方法返回你指定的数据(Mock对象),让测试通过。
Mock过程的使用前提:
(1) 实际对象时很难被构造出来的
(2) 实际对象的特定行为很难被触发
(3) 实际对象可能当前还不存在,比如依赖的接口还没有开发完成等等。
Mockito官网:https://site.mockito.org 。Mockito和JUnit一样是专门针对Java语言的mock数据框架,它与同类的EasyMock和jMock功能非常相似,但是该工具更加简单易用。
Mockito的特点:
(1) 可以模拟类不仅仅是接口
(2) 通过注解方式简单易懂
(3) 支持顺序验证
(4) 具备参数匹配器
# Mockito使用
maven引入spring-boot-starter-test会自动将mockito引入到工程中。
# 使用案例
(1) 在之前的代码中在定义一个BookService接口, 含义是借书接口,暂且不做实现
public interface BookService {
    Book orderBook(String name);
}
2
3
(2) 在之前的StudentService类中新增一个orderBook方法,含义是学生预定书籍方法,其中实现内容调用上述的BookService的orderBook方法。
public Book orderBook(String name) {
   return bookService.orderBook(name);
}
2
3
(3) 编写单元测试方法,测试StudentService的orderBook方法,注意需要是Mockito对象(也即加@Mock注解)才能在when里调用,普通对象不行
@Test
public void orderBookTest() {
    Book expectBook = new Book(1L, "钢铁是怎样炼成的", "书架A01");
    Mockito.when(bookService.orderBook(any(String.class))).thenReturn(expectBook);
    Book book = studentService.orderBook("");
    System.out.println(book);
    Assert.assertTrue("预定书籍不符", expectBook.equals(book));
}
2
3
4
5
6
7
8
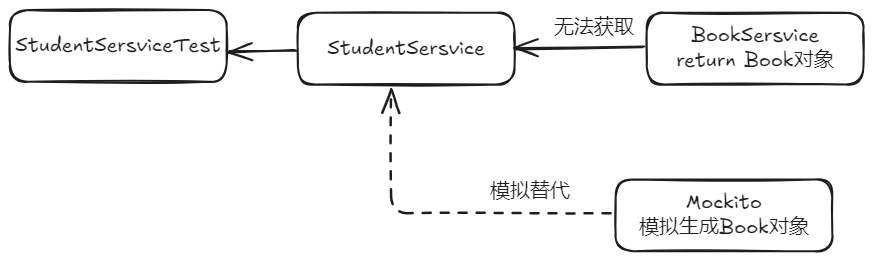
(4) 执行结果:
(5) 结果解析
上述内容并没有实现BookService接口的orderBook(String name)方法。但是使用mockito进行模拟数据之后,却通过了单元测试,原因就在于Mockito替换了本来要在StudentService的orderBook方法中获取的对象,此处就模拟了该对象很难获取或当前无法获取到,用模拟数据进行替代。
# 相关语法
常用API:
上述案例中用到了mockito的when、any、theWhen等语法。接下来介绍下都有哪些常用的API:
- mock:模拟一个需要的对象
- when:一般配合thenXXX一起使用,表示当执行什么操作之后怎样。
- any: 返回一个特定对象的缺省值,上例中标识可以填写任何String类型的数据。
- theReturn: 在执行特定操作后返回指定结果。
- spy:创造一个监控对象。
- verify:验证特定的行为。
- doReturn:返回结果。
- doThrow:抛出特定异常。
- doAnswer:做一个自定义响应。
- times:操作执行次数。
- atLeastOnce:操作至少要执行一次。
- atLeast:操作至少执行指定的次数。
- atMost:操作至多执行指定的次数。
- atMostOnce:操作至多执行一次。
- doNothing:不做任何的处理。
- doReturn:返回一个结果。
- doThrow:抛出一个指定异常。
- doAnswer:指定一个特定操作。
- doCallRealMethod:用于监控对象返回一个真实结果。
# 使用要点
(1) 打桩
Mockito中有Stub,所谓存根或者叫打桩的概念,上面案例中的Mockito.when(bookService.orderBook(any(String.class))).thenReturn(expectBook);就是打桩的含义,先定义好如果按照既定的方式调用了什么,结果就输出什么。然后在使用Book book = studentService.orderBook(""); 即按照指定存根输出指定结果。
@Test
    public void verifyTest() {
        List mockedList = mock(List.class);

        mockedList.add("one");

        verify(mockedList).add("one");			// 验证通过,因为前面定义了这个桩
        verify(mockedList).add("two");			// 验证失败,因为前面没有定义了这个桩
    }
2
3
4
5
6
7
8
9
(2) 参数匹配
上例StudentService的orderBook方法中的any(String.class) 即为参数匹配器,可以匹配任何此处定义的String类型的数据。
(3) 次数验证
@Test
    public void timesTest() {
        List mockedList = mock(List.class);
        when(mockedList.get(anyInt())).thenReturn(1000);
        System.out.println(mockedList.get(1));
        System.out.println(mockedList.get(1));
        System.out.println(mockedList.get(1));
        System.out.println(mockedList.get(2));

        // 验证通过:get(1)被调用3次
        verify(mockedList, times(3)).get(1);
        // 验证通过:get(1)至少被调用1次
        verify(mockedList, atLeastOnce()).get(1);
        // 验证通过:get(1)至少被调用3次
        verify(mockedList, atLeast(3)).get(1);
    }
2
3
4
5
6
7
8
9
10
11
12
13
14
15
16
(4) 顺序验证
@Test
    public void orderBookTest1() {
	    String json = "{"id":12,"location":"书架A12","name":"三国演义"}";
	    String json1 = "{"id":21,"location":"书架A21","name":"水浒传"}";
        String json2 = "{"id":22,"location":"书架A22","name":"红楼梦"}";
        String json3 = "{"id":23,"location":"书架A23","name":"西游记"}";
        when(bookService.orderBook("")).thenReturn(JSON.parseObject(json, Book.class));
        Book book = bookService.orderBook("");
        Assert.assertTrue("预定书籍有误", "三国演义".equals(book.getName()));

        when(bookService.orderBook("")).thenReturn(JSON.parseObject(json1, Book.class)).
                thenReturn(JSON.parseObject(json2, Book.class)).
                thenReturn(JSON.parseObject(json3, Book.class));
        Book book1 = bookService.orderBook("");
        Book book2 = bookService.orderBook("");
        Book book3 = bookService.orderBook("");
        Book book4 = bookService.orderBook("");
        Book book5 = bookService.orderBook("");
        // 全部验证通过,按顺序最后打桩打了3次,大于3次按照最后对象输出
        Assert.assertTrue("预定书籍有误", "水浒传".equals(book1.getName()));
        Assert.assertTrue("预定书籍有误", "红楼梦".equals(book2.getName()));
        Assert.assertTrue("预定书籍有误", "西游记".equals(book3.getName()));
        Assert.assertTrue("预定书籍有误", "西游记".equals(book4.getName()));
        Assert.assertTrue("预定书籍有误", "西游记".equals(book5.getName()));
}
2
3
4
5
6
7
8
9
10
11
12
13
14
15
16
17
18
19
20
21
22
23
24
25
(5) 异常验证
@Test(expected = RuntimeException.class)
    public void exceptionTest() {
        List mockedList = mock(List.class);
        doThrow(new RuntimeException()).when(mockedList).add(1);
        // 验证通过
        mockedList.add(1);
    }
2
3
4
5
6
7
# 如何提高单元测试覆盖率
可以使用squaretest等插件自动生成单元测试
# 使用Mockito框架
package com.shimao.iot.iotopenapi.service.impl;

import com.shimao.iot.common.bean.AttributesEntity;
import com.shimao.iot.common.bean.DeviceDataEntity;
import com.shimao.iot.common.bean.DeviceEntity;
import com.shimao.iot.common.bean.DeviceTypeEntity;
import com.shimao.iot.common.bean.device.UpdateBatchDeviceAttributeReq;
import com.shimao.iot.common.bean.member.EditShimaoFaceReq;
import com.shimao.iot.common.bean.member.ShimaoFaceReq;
import com.shimao.iot.common.elk.entity.DeviceReportEntity;
import com.shimao.iot.common.entity.ResultVO;
import com.shimao.iot.common.model.device.req.DeviceReportHeartReq;
import com.shimao.iot.common.model.device.req.DeviceReportInfoReq;
import com.shimao.iot.common.model.face.req.AlarmInfo;
import com.shimao.iot.common.model.face.req.DeviceStateReq;
import com.shimao.iot.common.model.face.req.FaceCollectInfoReq;
import com.shimao.iot.common.model.face.req.FaceCollectReq;
import com.shimao.iot.common.model.face.req.PassRecord;
import com.shimao.iot.iotopenapi.bean.dto.device.DeviceExtDataEntity;
import com.shimao.iot.iotopenapi.kafka.KafkaProducer;
import com.shimao.iot.iotopenapi.serviceFeign.DeviceFeignService;
import com.shimao.iot.iotopenapi.serviceFeign.ElkClient;
import com.shimao.iot.iotopenapi.serviceFeign.MemberClient;
import com.shimao.iot.iotopenapi.serviceFeign.OssService;
import org.junit.Assert;
import org.junit.Before;
import org.junit.Test;
import org.junit.runner.RunWith;
import org.mockito.InjectMocks;
import org.mockito.Mock;
import org.mockito.Mockito;
import org.mockito.MockitoAnnotations;
import org.powermock.modules.junit4.PowerMockRunner;
import org.springframework.beans.factory.annotation.Value;

import java.util.ArrayList;
import java.util.Arrays;
import java.util.List;
/**
 *
 * @author zhangtonghao
 * @create 2023-01-31 14:41
 */
@RunWith(PowerMockRunner.class)
public class DeviceReportServiceImplTest {
    @Mock
    private DeviceFeignService deviceFeignService;

    @Mock//外部对象
    private OssService ossService;

    @InjectMocks//测试对象
    com.shimao.iot.iotopenapi.service.Impl.DeviceReportServiceImpl deviceReportServiceImpl;


    static {
        System.setProperty("env", "baseline");
    }

    @Before
    public void setUp() {
        MockitoAnnotations.openMocks(this);
    }


    @Test
    public void testDeviceLockState() {
        // Setup
        DeviceStateReq req = new DeviceStateReq();
        req.setEntityCode("entityCode");
        req.setGwCode("gwCode");
        req.setTimestamp("timestamp");
        req.setReqId("reqId");
        req.setTypeCode("typeCode");
        req.setOpt("opt");
        req.setMsgType("msgType");
        //存取code
        AlarmInfo alarmInfo = new AlarmInfo();
        alarmInfo.setCode("10000");
        alarmInfo.setMessage("message");
        alarmInfo.setPictureUrl("pictureUrl");
        req.setAlarmInfo(alarmInfo);
        req.setAttributesEntities(Arrays.asList(new AttributesEntity(0L, 0L, "attributeCode", "value")));
        PassRecord passRecord = new PassRecord();
        passRecord.setId("id");
        passRecord.setRecordId("recordId");
        passRecord.setName("name");
        passRecord.setPassPhoto("passPhoto");
        passRecord.setPassMode("passMode");
        passRecord.setResultType(0);
        passRecord.setPassTime("passTime");
        passRecord.setCode("10000");
        passRecord.setPersonType(0);
        req.setPassRecords(Arrays.asList(passRecord));

        // Configure DeviceFeignService.queryDeviceInfoByDeviceCode(...).
        DeviceExtDataEntity deviceExtDataEntity = getDeviceExtDataEntity();

        Mockito.when(deviceFeignService.queryDeviceInfoByDeviceCode(Mockito.any())).thenReturn(deviceExtDataEntity);
        Mockito.when(deviceFeignService.updateAttributesById(Mockito.any())).thenReturn(ResultVO.ok(null));
        Mockito.when(ossService.uploadByBase64(Mockito.any())).thenReturn(ResultVO.ok(null));

        // Run the test
        ResultVO result = deviceReportServiceImpl.deviceLockState(req);

        // Verify the results
        Assert.assertNotNull(result);
    }


    private DeviceExtDataEntity getDeviceExtDataEntity() {
        AttributesEntity attributesEntity = new AttributesEntity();
        attributesEntity.setEntityId(11L);
        attributesEntity.setAttributeCode("11L");
        attributesEntity.setValue("11");
        List<AttributesEntity> attributes = new ArrayList<>();
        attributes.add(attributesEntity);

        DeviceExtDataEntity deviceExtDataEntity = new DeviceExtDataEntity();
        deviceExtDataEntity.setChannel(1);
        deviceExtDataEntity.setSpaceId(11L);
        deviceExtDataEntity.setTypeCode("1");
        deviceExtDataEntity.setComdTopic("1");
        deviceExtDataEntity.setDeviceCode("11");
        deviceExtDataEntity.setDeviceId(11L);
        deviceExtDataEntity.setDeviceName("11L");
        deviceExtDataEntity.setDiff("11");
        deviceExtDataEntity.setPanType("11");
        deviceExtDataEntity.setSourcePlatform("11");
        deviceExtDataEntity.setSpaceId(11L);
        deviceExtDataEntity.setIconUrl("11");
        deviceExtDataEntity.setRootSpaceId(11L);
        deviceExtDataEntity.setAttributesEntities(attributes);
        deviceExtDataEntity.setStatus(1);
        return deviceExtDataEntity;
    }
}
2
3
4
5
6
7
8
9
10
11
12
13
14
15
16
17
18
19
20
21
22
23
24
25
26
27
28
29
30
31
32
33
34
35
36
37
38
39
40
41
42
43
44
45
46
47
48
49
50
51
52
53
54
55
56
57
58
59
60
61
62
63
64
65
66
67
68
69
70
71
72
73
74
75
76
77
78
79
80
81
82
83
84
85
86
87
88
89
90
91
92
93
94
95
96
97
98
99
100
101
102
103
104
105
106
107
108
109
110
111
112
113
114
115
116
117
118
119
120
121
122
123
124
125
126
127
128
129
130
131
132
133
134
135
136
137
138
# 常用注解及方法
@RunWith(PowerMockRunner.class)
是JUnit的一个Runner,PowerMockRunner通过使用Java Instrumentation API和字节码操作库ByteBuddy,使得Java类和对象避免了Java单继承和final类限制,能够进行更灵活的mock测试。在JUnit中使用@RunWith(PowerMockRunner.class)来运行单元测试,可以使用PowerMock框架进行Mocking、Stubbing和Verification等操作,它可以完全模拟一个无法模拟的对象,如静态方法、final类、private类等。此外,PowerMockRunner还支持EasyMock和Mockito等常见的Mock技术。
@Mock
所谓的mock就是创建一个类的虚假的对象,在测试环境中,用来替换掉真实的对象,以达到两大目的:
- 验证这个对象的某些方法的调用情况,调用了多少次,参数是什么等等
- 指定这个对象的某些方法的行为,返回特定的值,或者是执行特定的动作
是一个Mockito框架中的注解,它可以用于创建一个模拟对象。使用@Mock注解可以使测试代码更简洁并且便于阅读,无需手动创建模拟对象。
具体来说,@Mock注解通常用于测试类中需要测试的类所依赖的对象。当我们使用@Mock注解标注一个对象时,这个对象的行为可以被模拟,以便对测试目标类进行测试。在对模拟对象进行测试时,我们可以设定模拟对象的返回值或行为,并用这些值来测试测试目标类的行为。
需要注意的是,使用@Mock注解必须先使用Mockito.mock()初始化Mock对象。通常,我们会在测试类的setUp()方法中使用@Mock注解来初始化Mock对象,这样测试类的每个测试方法都可以使用它。
同时还需要注意,@Mock注解只是用于创建一个模拟对象,在使用这个对象进行测试时,需要手动设定其返回值或行为。
@InjectMocks
是Mockito框架中的注解。它可以自动为测试类中声明的变量注入被mock的对象。使用@InjectMocks注解可以让测试代码更加简洁和易读,无需手动创建对象。
具体来说,@InjectMocks注解通常用于注入一个类的成员变量,这个成员变量通常是另外一个类的实例(被mock的对象)。在测试类实例化时,Mockito会自动查找这个被mock对象的实例,然后把它注入到@InjectMocks注解标识的变量中。
需要注意的是,@InjectMocks注解仅仅用于自动注入成员变量。如果需要mock类的方法,应该使用@Mock注解。
同时,如果一个类里面有多个同类型的成员变量,需要手动使用@Qualifier注解来指定需要注入的对象。当然你也可以通过不同名称来区分同一类型的变量。
Mockito.when()
是Mockito框架中的一个方法,它可以被用于设定模拟对象的行为。该方法通常和@Mock或@Spy注解一起使用,用于模拟对象的行为并指定返回值或者其他行为。
具体来说,Mockito.when()方法接受两个参数,一个是模拟对象的方法调用,另一个是指定的行为或返回值。当模拟对象的方法被调用时,Mockito就会按照when()方法中指定的方式进行处理。例如,可以使用Mockito.when()方法来模拟一个方法的返回值.
需要注意的是,Mockito.when()方法并不会真正地执行方法,而是返回了一个指定的返回值或设定的行为,用于在测试中进行验证。同样需要注意的是,如果模拟对象的方法参数不是一个基本类型或String,则需要手动匹配参数。
Mockito.any()
它可以用于匹配任意类型的参数。在测试代码中,当需要匹配方法的参数但不关心具体的参数值时,可以使用Mockito.any()方法来匹配参数。
具体来说,Mockito.any()方法可以用于模拟对象的方法调用或验证方法调用时的参数匹配。
需要注意的是,当使用Mockito.any()方法时,需要确保模拟方法的返回值与模拟方法的参数类型兼容。
# 常用的 Mockito 方法
Mockito的使用,一般有以下几种组合:参考链接
- do/when:包括doThrow(…).when(…)/doReturn(…).when(…)/doAnswer(…).when(…)
- given/will:包括given(…).willReturn(…)/given(…).willAnswer(…)
- when/then: 包括when(…).thenReturn(…)/when(…).thenAnswer(…)/when(…).thenThrow(…)
Mockito 的多种匹配函数,部分如下:
| 函数名 | 匹配类型 |
|---|---|
| any() | 所有对象类型 |
| anyInt() | 基本类型 int、非 null 的 Integer 类型 |
| anyChar() | 基本类型 char、非 null 的 Character 类型 |
| anyShort() | 基本类型 short、非 null 的 Short 类型 |
| anyBoolean() | 基本类型 boolean、非 null 的 Boolean 类型 |
| anyDouble() | 基本类型 double、非 null 的 Double 类型 |
| anyFloat() | 基本类型 float、非 null 的 Float 类型 |
| anyLong() | 基本类型 long、非 null 的 Long 类型 |
| anyByte() | 基本类型 byte、非 null 的 Byte 类型 |
| anyString() | String 类型(不能是 null) |
| anyList() | List 类型(不能是 null) |
| anyMap() | Map<K, V>类型(不能是 null) |
# 模拟异常的写法
doAnswer(invocation -> {throw new Exception();}).when(aService).getResult();
# 返回为空的写法
CmsPrefrenceAreaService service = mock(CmsPrefrenceAreaService.class);
doNothing().when(service).doSomeThing();
2
# 模拟静态类的写法
private static MockedStatic<FileUtil> fileUtil;

@Before
public static void init(){
    fileUtil = mockStatic(FileUtil.class);
}
@Test
public void test(){
    ftpUtil.when(() -> FtpServiceUtil.ftpLogin(anyString(), anyInt(), anyString(), anyString())).thenReturn(new FTPClient());

}
@After
public static void init(){
    fileUtil.close();
}
2
3
4
5
6
7
8
9
10
11
12
13
14
15